Designing waterproof enclosures involves understanding some key principles, and this guide is here to help. It will walk you through the necessary steps to develop a high-quality waterproof product that not only meets large-scale production requirements but also excels in functionality and water resistance, ensuring it performs exactly as required.
What's an IP Rating?
When we talk about making a waterproof enclosure for electronics, we’re really talking about its IP rating. This rating tells you how good the product is at keeping stuff like dust and water out.
Decoding the IP Code
The IP code has two numbers, in the format IPXX. The first number is about keeping out solids—anything from fingers to dust. It goes from 0 (not protected) to 6 (totally sealed off). The second number is for water. It starts at 0 (no protection) and goes up to 8 (can handle being under water for a while), and sometimes you’ll see a 9K, which is extra tough, handling hot water.
What the Ratings Mean
These ratings are super important because they give you a quick idea of what your product can handle:
- IPX6: Can take strong jets of water from any side.
- IPX6K: Like IPX6 but even stronger against high pressure.
- IPX7: Can be underwater for 30 minutes at a depth of 1 meter.
- IPX8: Can go deeper than 1 meter—usually around 3 meters—and stay there for 30 minutes.
- IPX9K: This one’s a big deal—it can take hot, high-pressure water from different angles.
Starting with the Basics: Waterproof Industrial Design
When we talk about starting with ‘industrial design’, we’re referring to the initial concept—the ‘make it pretty’ phase. But don’t worry, our focus is on the ‘make it work’ aspect. It’s about ensuring that the design is not only aesthetically pleasing but also functional, especially when it comes to waterproof design.
For this article, we’ll use a two-part case molded in ABS as an example.

Jerry S.

Mechanical Engineer
"The holy grail of good speed, quality, and price for custom parts"
Jiga is the best way to get the parts you need, when you need them.
Selecting Appropriate Materials in Waterproof Enclosure Projects
For those of you looking into how to make a waterproof box for electronics, the material choice is critical. If you need more strength, you might lean towards an ABS/PC blend. But beware, this blend doesn’t play well with oils or solvents—it can weaken the material and lead to damage. Any screws used need to be clean, as any oil on them can seep into the plastic over time, causing the parts to fail.
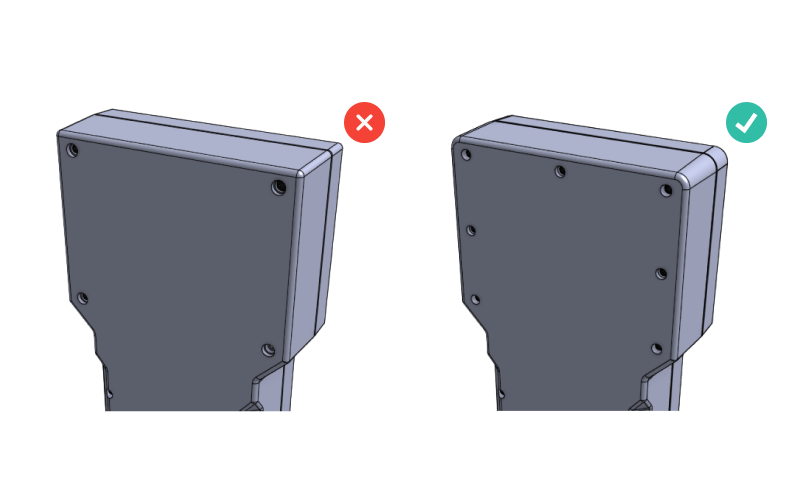
Optimizing Corner Design for Enhanced Waterproofing
Sharp corners can be problematic. They’re harder to seal and more prone to damage. A more gradual flow between faces, with rounded corners, can improve both the seal and the durability of the case.
Effective Assembly Strategies for Enclosure Water Resistance
When it comes to putting the case together, we want to avoid the unsightliness of exterior nuts and bolts. Using internal threaded inserts like brass or stainless steel is an option, especially for larger products or those that require regular servicing. However, these can be tricky to implement and can introduce their own problems.
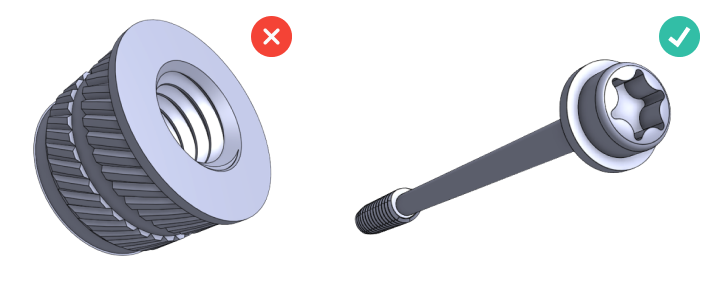
Instead, we’ll be using M2 Plastite trilobular thread-forming screws with TORX heads – these drivers are more factory friendly. These screws create a strong hold without damaging the material and are ideal for a waterproof enclosure design aiming for higher IP ratings like IPX6K or IPX7. The use of washer heads can distribute the load, preventing the screws from digging into the case, which is essential for maintaining a good seal.
For a less conspicuous finish, we can opt for chemical blackening of the screws. However, the shiny steel can also add a nice touch to the design.
You might think M2 screws are small, and you could go up to M2.5 or M3, but the size increase doesn’t significantly enhance strength and can make the case bulkier. For bigger products, M2 screws are usually sufficient, but you have the flexibility to go larger if the design allows for it.
Advanced Sealing Techniques in Enclosure Design
Sealing your waterproof enclosure is the crux of ensuring its effectiveness, and there are several ways to achieve this. However, not all methods are equal when you’re looking to produce at scale.
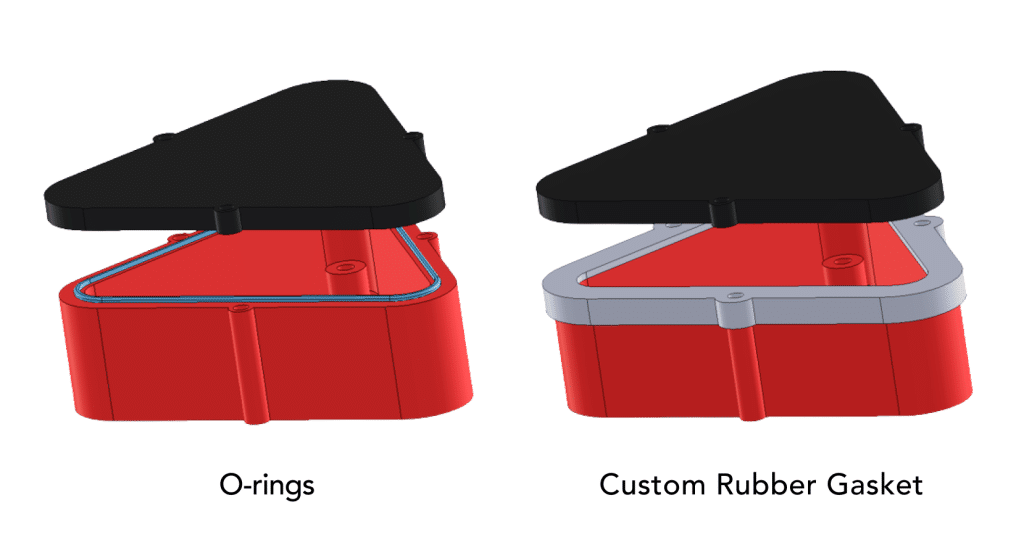
The Challenge with O-Rings
While O-rings might seem like a go-to solution, they come with their own set of challenges. They can be tricky to assemble without causing twists or misplacements, and any minor error can compromise the waterproofing—especially when aiming for an IPX6 rating or higher. They might work for handcrafted, low-volume products, but they’re not ideal for large-scale production.
Custom Rubber Gaskets: A Step Up
Moving to a custom rubber gasket that combines all sealing elements into one is a significant improvement. It simplifies assembly and reduces the chance of misplaced seals. However, it’s not without flaws. The gasket needs to be large enough to handle, which can result in a bulkier look that might not be desirable for every product. It’s a decent choice for moderate production volumes but might not be the fastest to assemble.
The Winning Strategy: Overmolding
For mass-produced waterproof products, overmolding the seal is the standout method. It takes the burden off assembly workers since the seal is integrated into the product during manufacturing. This not only speeds up the process but also minimizes human error, as the seal placement is consistent and no longer reliant on manual dexterity.
The upfront investment in an extra tool for overmolding might seem steep, but considering the cost of field failures—not to mention the potential damage to customer relationships—the investment pays off rapidly, especially if your product has a higher price point.
As Henry Ford pointed out, the cost of not having the right tool can exceed the investment in the tool itself. By choosing overmolding, you’re not just buying a tool; you’re investing in the reliability and efficiency of your waterproof product’s future.
The Importance of Seal Pressure
Seal clamping is another crucial aspect of designing a waterproof enclosure for electronics. It’s not just about keeping water out; it’s also about handling internal pressure changes due to temperature variations. Handheld products often experience significant temperature shifts, which can cause the internal pressure to fluctuate.

Javier L
Principal Systems R&D Mechanical Engineer
"Game changing in the online manufacturing space"
Jiga is the best way to get the parts you need, when you need them.
Dealing with Temperature-Induced Pressure Changes
- Air Expulsion: When a product heats up and the internal pressure increases, it might expel air, which seems harmless initially.
- Air Ingression: The real issue arises when the product cools down. This reverse pressure gradient can cause the product to suck in air. If this air is moist, it can lead to internal damage, either quickly or over time.
- Desiccant Pouches: While these can delay moisture-related issues, they are not a permanent solution. Moisture trapped inside can still fog up display windows and corrode the electronics, especially when the product warms up.
- Venting as a Solution: Venting with a moisture barrier can be effective, but it requires meticulous maintenance. The hydrophobic layer of the barrier must remain clean; otherwise, it can easily become ineffective. Moreover, rapid heating or cooling can overwhelm the barrier, leading to pressure spikes.
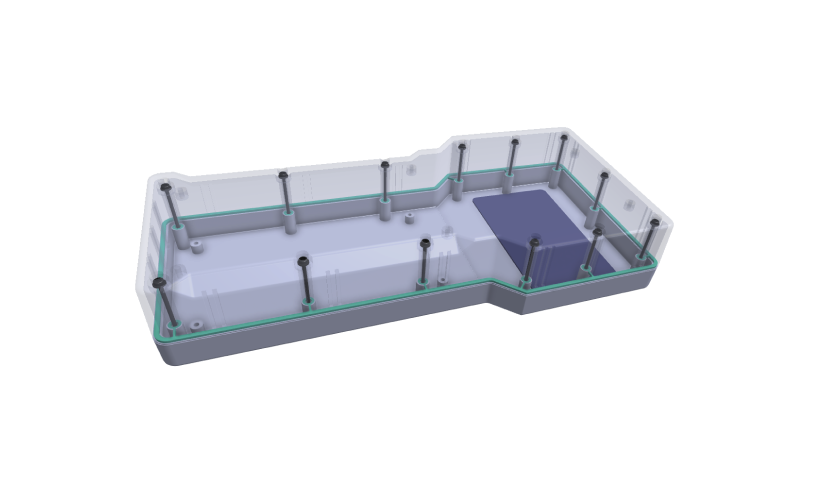
A Comprehensive Approach to Seal Clamping
Given these challenges, a more robust approach to seal pressure is advisable. The goal is to ensure that the enclosure can’t bulge between the fixings, which might compromise the seal. Adding extra screws is a cost-effective way to reinforce the seal, and with an overmolded seal, the additional holes pose minimal risk.
Ideal Fixing Distribution
The original industrial design might have had a certain distribution of fixings, adequate for an IPX6 rating but not sufficient for higher standards like IPX6K or IPX7. Based on experience, a more effective layout would involve placing fixings no more than 35mm apart. This closer distribution of screws ensures a more consistent and reliable seal, crucial for achieving higher IP ratings.

Key Considerations for the Gasket
The gasket is the linchpin of a waterproof design. Its effectiveness hinges on two critical factors: its correct placement without any faults, and high compression at potential leakage points.
Different Scenarios and Gasket Choices
- For a Single Product: If you’re making just one item, and it’s going to be hand-assembled, O-rings can be sufficient. They’re manageable for a one-off project.
- For a Moderate Volume Production: If you’re aiming to produce about 100 units, and you have skilled assemblers, then a custom-molded rubber gasket is a viable option. It’s more labor-intensive and requires careful inspection, but it’s doable.
- For High-Volume Production: When the goal is to produce hundreds of units daily, with a fast-moving production line and less skilled labor, overmolding the gasket becomes essential. Without this, you risk facing a high percentage of seal-related failures.

The Advantages of Overmolding
Overmolded gaskets offer unparalleled precision and reliability. This precision allows for exact compression, ensuring both the effectiveness and durability of the seal. This method is proven in mass production environments, where keeping the elements out is non-negotiable.
Cost-Effectiveness and Quality Assurance
The cost of the extra tooling for overmolding can vary widely, but the investment is justified when you consider the broader economic picture. For instance, if a product costs $50 to produce and a field failure incurs a cost of $200, a $3,000 tool would pay for itself after preventing just 15 failures.
Moreover, this approach streamlines assembly and reduces the need for extensive quality assurance checks associated with less precise gasket solutions.
Detailed Gasket Features
Looking closely at a well-designed, overmolded gasket, you’ll notice features like ‘pinch points’—small, pointed ridges around screw holes and along the enclosure’s perimeter. These ridges ensure consistent compression, accommodating the varying forces exerted by screws and the minor flexing of the case.

Gasket Placement and Control
In waterproof enclosure design, especially for electronics, the placement and control of the gasket are crucial for ensuring a durable and effective seal. Let’s delve into the specific design elements that make a significant difference.
Gasket Size and Containment
- Groove Dimensions: In the case we’re examining, the groove in the bottom wall is 1.8mm wide and 1mm deep, with an overall wall thickness of 2.4mm. The resulting 0.5mm wide skirts provide essential containment, preventing the gasket from bulging under pressure.
- Tooling Considerations: The groove’s shallow depth means it doesn’t require much draft; its parallel structure can be easily removed from the tooling due to its formation from the force side.

Aesthetic and Functional Design Elements
- Step at the Joint Line: There’s a deliberate small step at the product’s joint line. This not only facilitates cleaner tooling but also helps mask any imperfections in the component parting line, enhancing the product’s overall appearance.

Detailed Features for Effective Sealing
Case Top Features
- Compression Ridges: A 90° pointed ridge on the screw post compresses each screw gasket, while a small skirt wraps over the gasket to prevent bulging and maintain pressure.
- Double Row Ridge: Along the box’s periphery, a double row ridge is used where compression forces are relatively lower.
Screw Pillar Design
- Screw Pillar Adaptation: The screw hole expands to the outside diameter of the thread for a depth of 1.5mm, creating an undamaged collar of plastic at the top of the pillar. This feature is critical for maintaining the integrity of the pillar, even if the thread causes some damage.

Selecting the Right Screw
The screw is a central element in the design of waterproof enclosures, especially when aiming for high IP ratings. A specialized screw can make a significant difference in both the assembly process and the long-term reliability of the product.
Characteristics of the Ideal Screw
- Head Type: T6 or T7 Torx heads are recommended. They provide excellent engagement and can be easily driven with hand tools or automated equipment.
- Thread Type: A trilobe plastite M2 thread is suggested, based on our extensive expeience. This is a thread-rolling type rather than thread-cutting, which is gentler on the material and forms a stronger bond.
- Material and Durability: The screws are made of hardened 420 stainless steel, which is robust enough to prevent the head from being torqued off. This material choice ensures durability and longevity.

Fine-Tuning Screw Implementation
- Pillar Hole Sizing: Finding the ideal screw pillar hole size is essential. Typically, a diameter hole of about 1.4-1.55mm works well for an M2 nominal screw. However, this can vary based on the screw manufacturer and the specific polymer used in the molding.
- Adjustments for Different Polymers: The hole size may need to be adjusted depending on the type of polymer used in the enclosure’s construction. Different materials can react differently to the screw, affecting the overall integrity of the seal.
Sealing the Deal: Key Takeaways
Designing waterproof enclosures for electronics is a blend of choosing the right materials, like ABS, and paying attention to details such as IP ratings and overmolded gaskets for sealing. The selection of specialized screws is also crucial. This approach balances functionality with ease of manufacturing, ensuring that the final product is not only technically sound but also practical in real-world use.
